

Azure Static Web Apps and the Trailing Slash
I recently published a blog post on setting up Twitter Cards in Hugo and shared it on Twitter …
In my previous post I wrote on automating a Docker Swarm cluster deployment to Azure Container Service through the use of a deployment script. Today’s post will focus on the second part of the ACS Swarm GitHub Repo I previously referenced.
This is part 2 of a 3 series post discussing how to use each piece of the repository. This post will focus on dockerizing an ssh tunnel to our previously deployed ACS Docker Swarm Cluster. The main pieces to be discussed are the ssh-tunnel.sh script and the Dockerfile both located in the sshtunnel folder.
To be honest, this code is really helpful in CI/CD scenarios where you you need to run IaC and test automation for web apps via Docker containers in ACS and you need an SSH tunnel.
It should be noted that this dockerized ssh tunnel can be scaled for any ssh instance, not just Docker Swarm through ACS.
Now, let’s talk about use case. The reality is the method we will dive into here isn’t one the every day person would probably use. You might find this post helpful in the following scenarios:
– you don’t want to open an ssh tunnel on your local client machine or you’re unable to do so
– you want to keep the private key baked into the image/container
– you foresee needing to move the container around with an open tunnel to your ACS cluster
– you want to share the container/image in a private hub/registry with other members of your dev/ops team without having to configure the environment constantly (I.E. copying private key, opening the tunnel, setting local environment variables, etc.)
– you have some other reason for dockerizing an SSH tunnel
This post will dive into not only how to create the ssh tunnel in code, but also how to save it in an image/container, which really creates the local endpoint, too. Remember, we created our remote endpoint (ACS Docker Swarm Cluster) in our previous post.
Let’s start with the Dockerfile:
FROM jldeen/alpine-docker
MAINTAINER jessde@microsoft.com

# Copy private key - update path accordingly for location of private key
COPY id_rsa /root/.ssh/id_rsa

# Turn SSH on and add private key to identities
RUN eval `ssh-agent -s` && /usr/bin/ssh-add /root/.ssh/id_rsa

# Azure ENV for Azure Login ENV spn=[insert-content-here]
ENV tenant=[insert-content-here]

# Set DOCKER_HOST Env Variable
ENV DOCKER_HOST=:2375

# Set ACS Tunnel Variables
ENV Servicename=[insert-content-here]
ENV Resource=[insert-content-here]
ENV local_port=2375
ENV remote_port=2375

# Confirm env var set properly - testing only
RUN echo $DOCKER_HOST # Expose port for container EXPOSE 2375

# Copy SSH Tunnel Script and make executable
COPY sshtunnel/ssh-tunnel.sh /usr/local/bin/
RUN chmod +x /usr/local/bin/ssh-tunnel.sh

# Open SSH tunnel
ENTRYPOINT ["/usr/local/bin/ssh-tunnel.sh"]
CMD ["sh"]
First, remember to modify the Dockerfile to your environment. As such, you will have to define the Servicename and Resource [group] with the same names you defined for the ACS deployment. You will also have to enter the SPN and Tenant variables. For your convenience, if you ran the script I wrote to create an SPN, you should have an azure.env file you can reference. You can also always grab the necessary information from your bashrc profile, too. DO NOT put your password as an ENV variable in the Dockerfile – this is not secure. The ssh-tunnel.sh script will prompt your for your password upon ENTRYPOINT.
Now, the first thing I’m doing is copying the previously created or defined private ssh key as part of the Docker image so it will be ‘baked’ into the image our ssh-tunnel container will use. I’m then turning the SSH service on and adding the key to the list of SSH identities – again, as part of the image itself.
Next, we are setting the DOCKER_HOST variable and echoing that back to us for confirmation. We also define any other variables needed such as the service name, resource group, and both the local and remote ports we need for our tunnel. Docker uses 2375, so this example configures them to 2375.
Finally, we copy our ssh-tunnel.sh shell script to our /usr/local/bin/ folder in the image, and ensure it is called upon “startup” or ENTRYPOINT in this case. If you’re curious about the Dockerfile used for the base “jldeen/alpine-docker” image, you can view the Dockerfile for that image here.
Now, we have to build our ssh-tunnel image. From the root of our repo, we can use the following command to build:
docker build -t sshtunnel -f sshtunnel/Dockerfile .
Note: I am using the -f switch to specify the location of where the Dockerfile is stored. You will want to adjust this according to the specifications of your environment.
Doing all of the above means we can start a container with our specialized image, aka, our Dockerized ssh tunnel, and pass docker commands for our ACS swarm cluster directly. For example, let’s say we called our image “sshtunnel” during our Docker build, we are now able to run commands through an interactive container, to our Docker Swarm cluster in Azure, all from one command:
docker run -it sshtunnel docker run -d --name docker-nginx -p 80:80 nginx
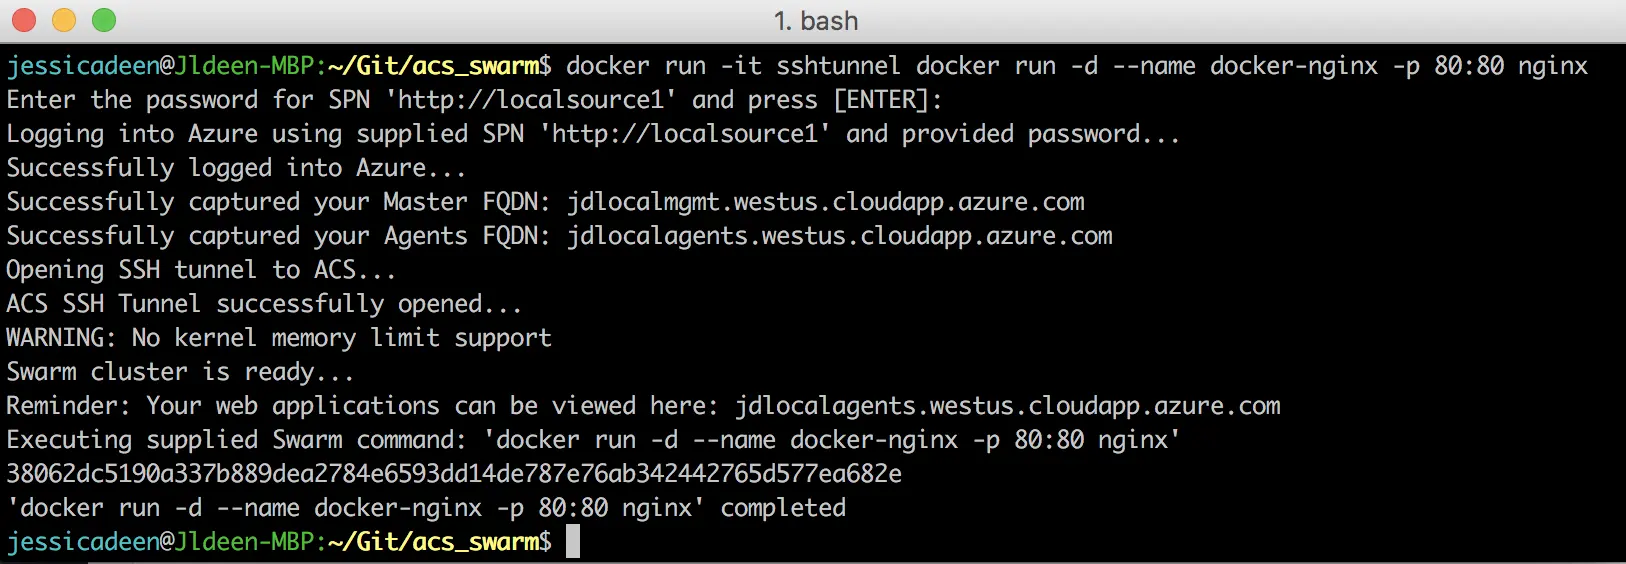
As you can see in the picture, I ran an interactive container using my sshtunnel image and then immediately gave the command I wanted to run against the ACS Docker Swarm cluster: ‘docker run -d –name docker-nginx -p 80:80 nginx’. As part of the output, I’m even told where I can go to view my newly deployed web applications.
Now, let’s talk about how that’s working. Prior to diving into the ssh-tunnel script, let’s review my previous post on creating an SSH tunnel to ACS; everything I wrote about as a step-by-step is what I have automated here in code and “Dockerized.”
Let’s break down our ssh-tunel.sh script…
Lines 3-18 will grab the SPN password and store it in a variable, check for an Azure login to already exist; if none is found, we call a login to Azure.
# Capture Azure SPN password in variable as part of Dockerfile
    echo "Enter the password for SPN '$spn' and press [ENTER]: "
    read -s password

# Login into azure using SPN
	if az account show &>/dev/null; then
		echo "You are already logged in to Azure..."
	else
		echo "Logging into Azure using supplied SPN '$spn' and provided password..."
			az login \
				--service-principal \
				-u $spn \
				-p $password \
				--tenant $tenant &>/dev/null
			echo "Successfully logged into Azure..."
	fi
Lines 20-26 capture the Master FQDN and Agents FQDN in environment variables we will use later on.
# Code to capture ACS master info
            master_fqdn=$(az acs show -n $Servicename -g $Resource | jq -r '.masterProfile | .fqdn')
            echo "Successfully captured your Master FQDN: $master_fqdn"

    # Code to capture ACS agents info
        agents_fqdn=$(az acs show -n $Servicename -g $Resource | jq -r '.agentPoolProfiles[0].fqdn')
        echo "Successfully captured your Agents FQDN: $agents_fqdn"
Lines 28-36 create the tunnel. If you notice, it’s the same command I’ve written about in previous blog posts, only with retry logic written in. The bulk of the command is just creating a tunnel. If the attempt to open the tunnel fails (Azure isn’t ready), the command will retry again up to 5 times.
# Create SSH Tunnel and check to ensure tunnel is successfully created, if errors, try again up to 5 times
	echo "Opening SSH tunnel to ACS..."
		n=0
		until [ $n -ge 5 ]
		do
			ssh -fNL $local_port:localhost:$remote_port -p 2200 azureuser@$master_fqdn -o StrictHostKeyChecking=no -o ServerAliveInterval=240 &>/dev/null && echo "ACS SSH Tunnel successfully opened..." && break
			n=$((n+1)) &>/dev/null && echo "SSH tunnel is not ready. Retrying in 5 seconds..."
			sleep 5
		done
Lines 38-45 check to see if the ACS Swarm cluster is ready for us to issue commands. If the check fails, I.E. the cluster isn’t ready, the script will wait 45 seconds and retry. The reason this section was added in is after ACS Swarm deployment completes, there is about 5 minutes worth of time between when you can actually open an ssh tunnel and issue commands. If you try to issue commands prior to the cluster being ready, the commands will fail as no Docker nodes will be available. I discovered this while working with these scripts through CI/CD tools. More on that to come in our final post…
# Check for ACS Cluster Node availability, if errors, try again up to 5 times - only necessary if ACS Cluster was recently deployed
	n=0
	until [ $n -ge 5 ]
	do
		docker info | grep 'Nodes: [1-9]' &>/dev/null && echo "Swarm cluster is ready..." && break
		n=$((n+1)) &>/dev/null && echo "Swarm cluster is not ready. Retrying in 45 seconds..."
		sleep 45
	done
Lines 47-55 were borrowed from Docker’s own docker-entrypoint.sh script as a way to allow us to call docker commands directly from an ENTRYPOINT script. This section captures our command and stores it in ‘$@’.
# Docker check if first arg is `-f` or `--some-option`
	if [ "${1:0:1}" = '-' ]; then
		set -- docker "$@"
	fi

# If our command is a valid Docker subcommand, invoke it through Docker instead - (this allows for "docker run docker ps", etc)
	if docker help "$1" &>/dev/null; then
		set -- docker "$@"
	fi
Finally, lines 56-68 remind us where we can view our web applications deployed to our ACS cluster and execute the supplied command. As a reminder of our example above, we supplied ‘docker run -d –name docker-nginx -p 80:80 nginx’ as our command; this section is the execution part, again with retry logic written in. I also added in an echo to confirm back to us which command was executed. Both the execution and echo is handled by line 64, specifically.
# Out to end user and execute docker command
	echo "Reminder: Your web applications can be viewed here: $agents_fqdn"
	sleep 5
	echo "Executing supplied Swarm command: '$@'"
	# Retry logic for executing command
	n=0
	until [ $n -ge 5 ]
	do
		eval "$@" && echo "'$@' completed"  && break
		n=$((n+1)) &>/dev/null && echo "Retrying '$@'in 5 seconds..."
		sleep 5
	done
	exit $?
Just to recap, the scripts shown here and those found in my ACS Swarm repo have been modified for use outside of a CI/CD tool, but our final post will review how you can tie all of this up and for use with CI/CD tools like Codeship Pro, Jenkins, VSTS, etc. In part 3 of this series, I will talk about how you can use these scripts in conjunction with a CI/CD tool as a means of incorporating DevOps best practices (IaC and Automation), which again, would the the primary use case for everything I have detailed here.

I recently published a blog post on setting up Twitter Cards in Hugo and shared it on Twitter …

All code featured in this blog post can be found here on GitHub. Problem Have you ever wanted …

We’ve all been there. You do everything correct - you set your container to run as non …