

How to show/hide the menu bar in macOS 11 Big Sur using AppleScript
*** EDIT *** As of now, the below code no longer works. However, thanks to a few comments from …
All code featured in this blog post can be found here on GitHub.
Have you ever wanted to automate a seemingly trivial task because doing so would result in some level, however small, of increased productivity? I have! Now it’s no secret people of all backgrounds and career fields have had to shift and adapt in recent years and working remotely in tech on a global team is no exception. As part of my job, I spend a lot of time in meetings with my camera on, and a few years ago I became obsessed with ensuring the experience for those I meet with virtually is as authentic as possible. In other words, I wanted the other person to see my face and my facial expressions as clearly as possible in hopes this would foster a more collaborative, friendly, and personable work environment.
I opted to invest in a Sony a6400 mirrorless camera with a Sigmia 16mm f/1.4 lens and some Elgato Key Lights. If you aren’t familiar with Elgato Key Lights, they are app controlled lights that you pair to your WiFi network; they can mount to your desk and they offer overhead lighting out of view of the camera. To control them, you can use the Elgato Control Center app on your computer of choice (Windows, or macOS), or you can use an Elgato StreamDeck. The StreamDeck is basically a hotkey/macro machine where you push a button and whatever macro or hotkey you’ve assigned to that button will trigger. The more meetings and pair programming sessions I found myself in, the more I discovered 2 key problems with my setup:
The first problem was the default Control Center software. I learned this software is highly unreliable when using separate VLANs (separate virtual local area networks). For security reasons, I keep all of my IoT (Internet of Things) devices on a separate and isolated IoT network, while my work devices remain on a prioritized “default” network.
The second problem is perhaps trivial, but none the less real for me - I had to keep pushing the macro button on my StreamDeck to trigger the request to turn the light on or off, and if the light had stopped responding in the Control Center software the button press wouldn’t work anyway. With those two problems in mind, I set out to invent a solution.
First, I began to look at how the request was sent to the Key Light. I discovered the Key Light had a webserver listening on port 9123 at the address of the light and port followed by /elgato/lights (i.e. http://192.168.1.2:9123/elgato/lights). Initially, I used curl to send a GET request to that webserver endpoint and received a sample JSON formatted response in return. This JSON response contained, among other things, keys that included on or off in the form of 0 or 1. Once I learned the format of the expected response through the GET action, I tested a PUT action to change the value from “off” or 0 to “on” or 1. The test worked immediately! I began to control my light using curl through the command line; this was an easy, and more importantly, reliable solution to the first problem. By the way, if you’re not familiar with curl, it is a simple command line tool for transferring data using a URL. Below is an example of the GET and PUT commands used:
# Get a JSON response from the light:
curl --location --request GET 'http://192.168.1.1:9123/elgato/lights'


# Send JSON to the light:
curl --location --request PUT 'http://192.168.1.1:9123/elgato/lights' \
--header 'Content-Type: application/json' \
--data '{
    "numberOfLights": 1,
    "lights": [
        {
            "on": 0, #change this to turn the light on/off
            "brightness": 20,
            "temperature": 213
        }
    ]
}'
The next part of the puzzle was to address the “button pressing” problem. In reality, I didn’t want to press the button on and off every time I was in a meeting or leaving a meeting just to have my light go on or off.
“Surely there must be a way to automatically turn the light on when my camera is activated and off when the camera is deactivated,” I thought to myself, and I was right.
Curl, while powerful, is also limited and quite verbose. I didn’t want to have to use curl to send a PUT request with formatted text to turn the light on or off every single time so I set out to write my own CLI (command line interface) that would send that HTTP transfer of data for me with commands of my choice. I opted to write the CLI in Rust because of the easy to use Command Line Argument Parser (a.k.a CLAP) Rust has available. I had never written in Rust before, but it turned out to be quite easy. I was able to setup arguments for “on” and “off” instead of 0 and 1 to make it more user friendly. I added support for environment variables for important things like the IP address of the lights, preset brightness, temperature, and number of lights. By storing these values as local environment variables whoever uses this CLI wouldn’t have to set them every time, but could also override them if they so wish using flags.
In the end, I was able to create this easy, lightweight, and most importantly, reliable CLI in a single weekend, and because of the way it’s written, it can even run on Linux, which Control Center did not natively support previously. With this new tool, I could easily operate the light from the command line by simply typing, keylight on or keylight off from my terminal.
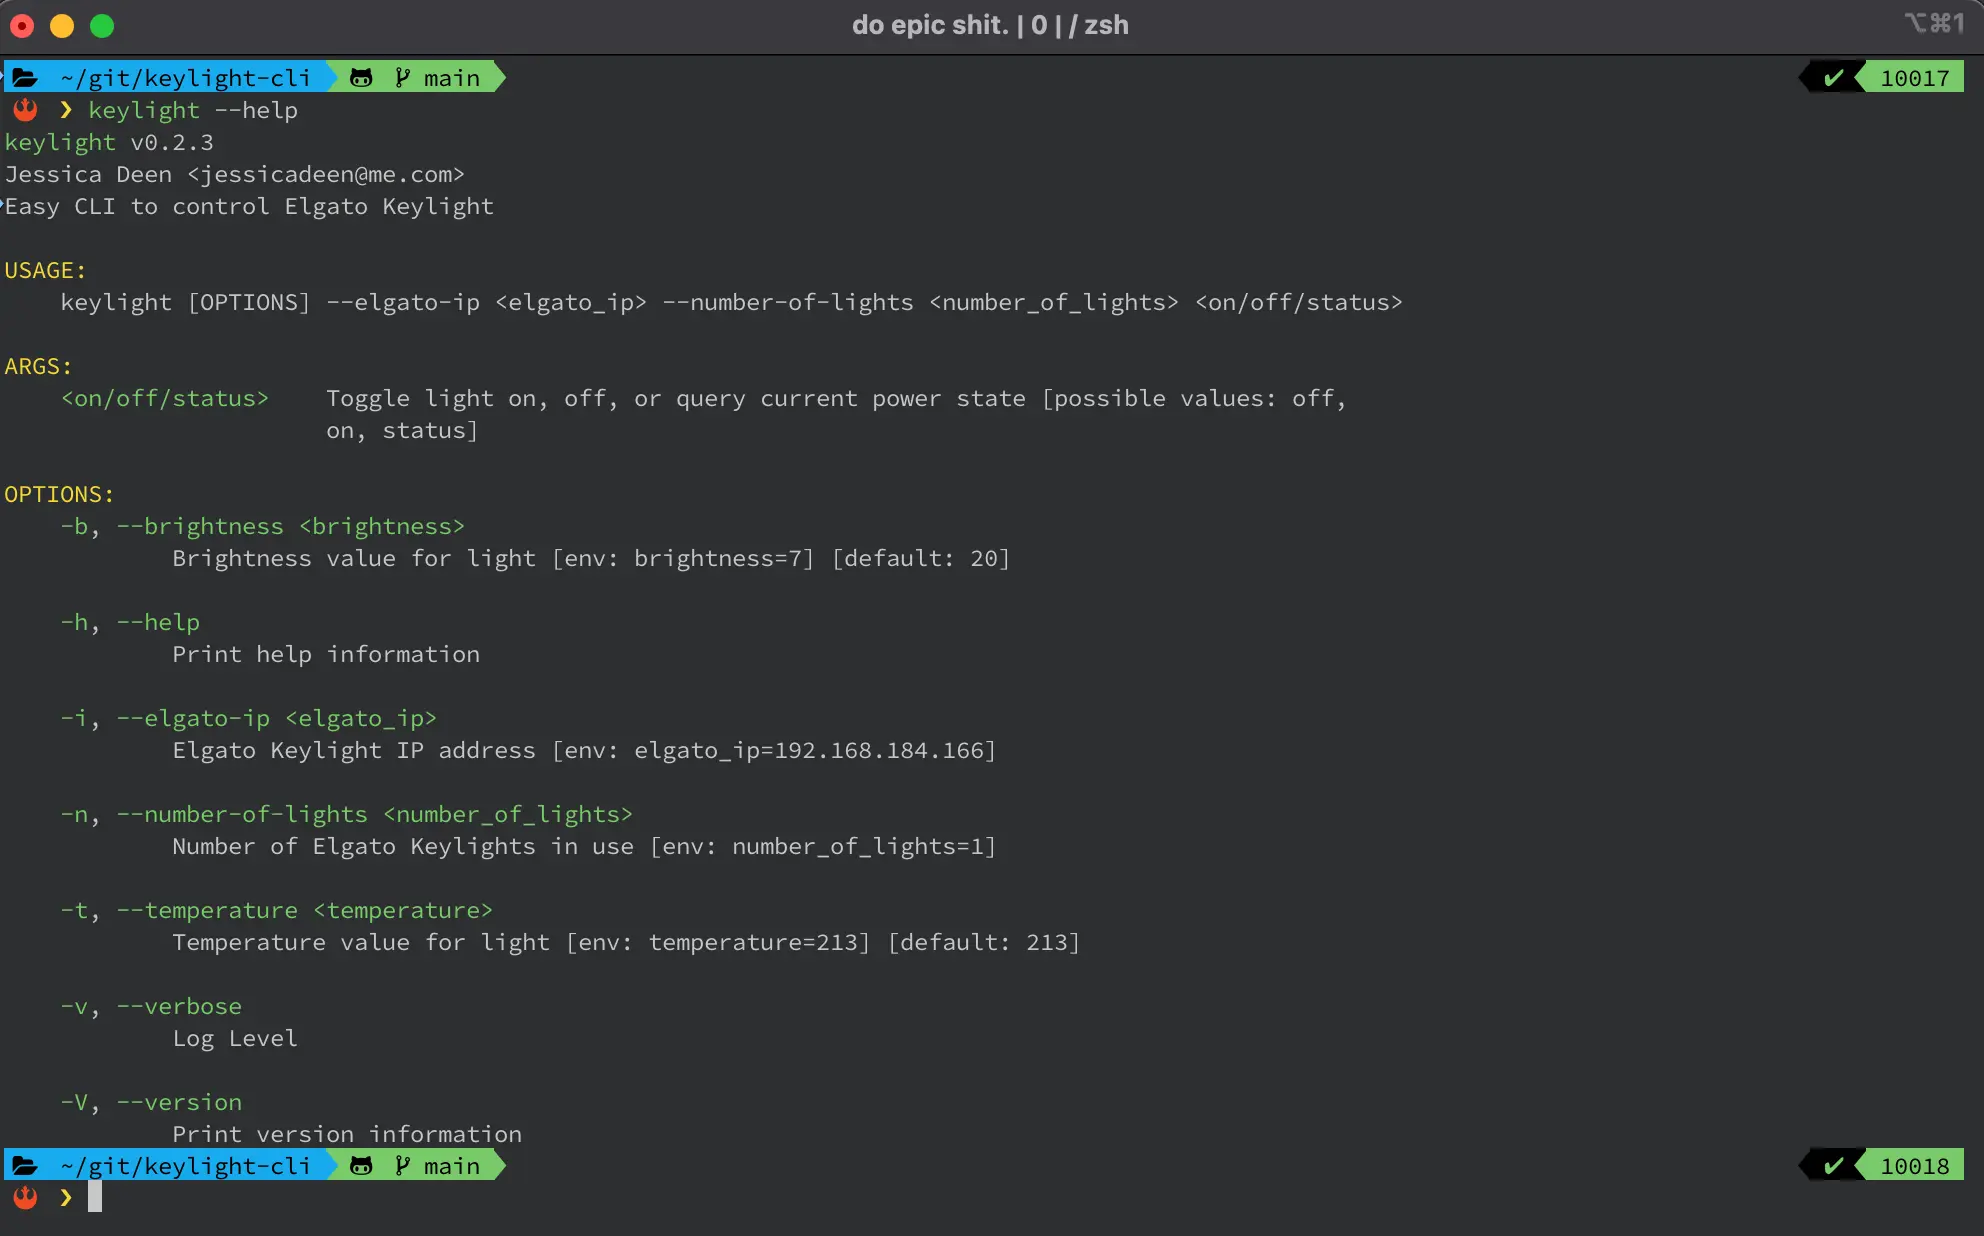
To get started with the cli, you can download the compiled binary from my releases on GitHub and then move the binary to your path. Below is an example:
# macos
wget -O keylight https://github.com/jldeen/keylight-cli/releases/download/v0.2.3/keylight-macos

sudo mv keylight /usr/local/bin/keylight

keylight status --elgato-ip <ip-address-here> --number-of-lights 1

# linux
wget -O keylight https://github.com/jldeen/keylight-cli/releases/download/v0.2.3/keylight-linux

sudo mv keylight /usr/local/bin/keylight

keylight status --elgato-ip <ip-address-here> --number-of-lights 1
If you prefer to build the binary yourself, make sure you have rust/cargo installed and then clone my repo:
# install rust/cargo
curl https://sh.rustup.rs -sSf | sh

# clone repo
git clone git@github.com:jldeen/keylight-cli.git && cd keylight-cli

# build keylight-cli
cargo build

# move binary to path
sudo mv target/debug/keylight /usr/local/bin/keylight

# test command
keylight status --elgato-ip <ip-address-here> --number-of-lights 1
Note: You can also add the flags to your .zshrc or .bash_profile as environment variables:
# add to .zshrc or .bash_profile
export elgato_ip=<ip-address-here>
export number_of_lights=1
export temperature=213
export brightness=7
The final part of my puzzle was tying everything I learned together to automate the light turning on or off based on the status of the camera. I did some digging online to learn how macOS’ log stream works and wrote a simple shell script to look for key events where the the camera stream started or stopped. As you can see in the snippet below, I used a simple if else statement to declare the expected behavior of the light - if the camera stream started per the logs, run keylight on; if the stream stopped, run keylight off.
#!/bin/bash
# https://apple.stackexchange.com/questions/424789/can-i-trigger-a-homekit-scene-when-my-laptops-camera-is-turned-on-or-off

exec log stream | grep -E --line-buffered 'UVCAssistant' | # filter for UVCAssistant so BT stream is ignored
grep -E --line-buffered '(stop|start) stream' | # filter log events
  # tee /dev/stderr |                           # output matching events for debugging
  sed -Eu 's/.*(start|stop).*/\1/' | # reduce the log message down to a single word identifying the event/state
  while read -r event; do                     # store that word in the $event variable
    echo "Camera state has changed to: $event"
    if [ "$event" = "start" ]; then
      # echo "Keylight on"
      keylight on
    else
      # echo "Keylight off"
      keylight off
    fi
  done
The final step is configuring this to run as a system daemon. From macOS, you can do this in a handful of steps. For these steps, you’ll likely want to clone my repo or manually grab the onair.sh script and the com.keylight.daemon.plist file:
# from within root of this repo folder
mkdir -p ~/bin && cp onair.sh ~/bin # makes a bin directory in your user's home folder, copies onair script to that folder

# add your ip address and system username to the plist file
sed -i 's/<REPLACE_IP_ADDRESS>/your-elgato-ip-address-here/g' com.keylight.daemon.plist
sed -i 's/<REPLACE_USER>/your-username-here/g' com.keylight.daemon.plist

# copy updated plist to launchdaemon folder
cp com.keylight.daemon.plist /Library/LaunchDaemons/com.keylight.daemon.plist

# load/start daemon/plist
sudo launchctl load -w /Library/LaunchDaemons/com.keylight.daemon.plist
Note: Logs are published to
/tmp/keylight.stdoutand/tmp/keylight.stderr.
If you want/need to troubleshoot things, you can tail these logs using tail -f /tmp/keylight.stdout and you should get output similar to the following:
# Output from tail -f /tmp/keylight.stdout
Camera state has changed to: stop
Elgato Keylight is: off
Camera state has changed to: start
Elgato Keylight is: on
Camera state has changed to: start
Elgato Keylight is: on
Camera state has changed to: stop
Elgato Keylight is: off
Camera state has changed to: stop
Elgato Keylight is: off
In the end, while seemingly trivial to perhaps anyone but myself, writing my own cross-platform CLI made a huge difference in my day-to-day productivity. This setup worked and still works brilliantly! In fact it works so well I don’t even have Elgato’s Control Center software installed on any device anymore. By having a reliable and automated solution for my overhead lights running on my system in the background I no longer have to think about controlling them whether I’m in a meeting or if someone calls me. In addition, because the script I wrote listens for ALL events where my camera’s status changes, I don’t have to worry about this solution being application specific - it works with Microsoft Teams, OBS, Zoom, Google Meets, Amazon Chime, etc. It’s truly a set it and forget it kind of idea.
*** EDIT *** As of now, the below code no longer works. However, thanks to a few comments from …

We’ve all been there. You do everything correct - you set your container to run as non …

If you haven’t yet read the first post in this series, I recommend checking it out now. …