
Azure Static Web Apps and the Trailing Slash
I recently published a blog post on setting up Twitter Cards in Hugo and shared it on Twitter …
In a previous post, I wrote about a method to initiate a non-interactive authenticated session to Microsoft Azure through the use of a service principal. Today’s post is similar, but I have updated the script to be used with Azure CLI 2.0 now that it is GA.
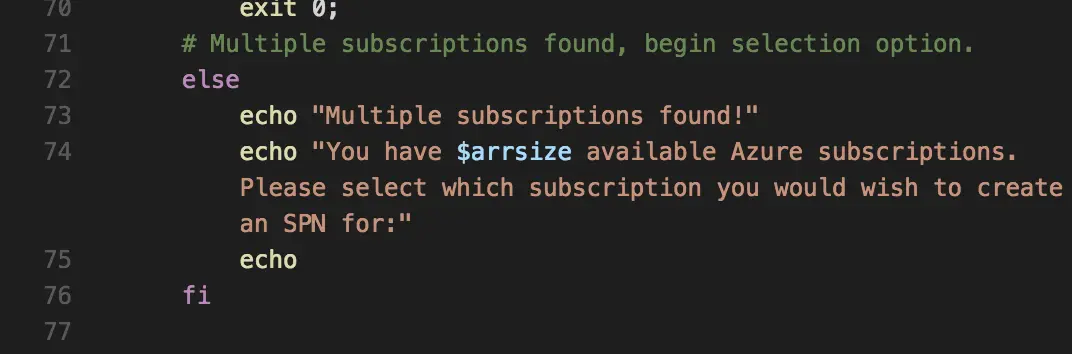
You will notice I have updated the script and we no longer use positional parameters. Also, the script now supports multiple subscriptions – if you have more than one subscription, the script will pull a list and prompt you to select which one you wish to use for SPN creation.
The important data is still as follows:
spn=service_principal_name password=service_principal_password tenant=azure_tenant_id
You will get the spn, password, and tenant ID from running the updated Service Principal Creation Script on your local machine with Azure-Cli 2.0 installed; upon creation, all three will be automatically exported as environment variables to ~/.bashrc. (Note: This script was written for Linux machines and as such will export the necessary environment variables for Linux enivronments. You will need to manually create environment variables for Windows if you wish to scale this script for a Windows environment.)
It is highly recommended you click here to learn how to use the service principal creation script.
Note: If you are using this method independent of the deployment script we talk about in Azure CLI 2.0 – Azure Container Service for Docker Swarm Deployment Script (Part 1), you will need to reload your bashrc profile first by sourcing it:
source ~/.bashrc or . ~/.bashrc
Next, to use the above in conjunction with a non-interactive login session you will simply use the following code:
<div>az login \         --service-principal \         -u $spn \         -p $password \         --tenant $tenant

</div>
There you go! You will automatically be logged in without any pop-up windows or interaction required on your end. Just like before, you can add this into .sh scripts to fire off as part of your CI/CD pipeline, or simply execute the above line of code.
For more information about how using an SPN allowed Codeship to add support for Microsoft Azure, or for information on how to use Codeship Pro with Microsoft Azure, checkout the official documentation here and the official Github repo here.
I recently published a blog post on setting up Twitter Cards in Hugo and shared it on Twitter …

All code featured in this blog post can be found here on GitHub. Problem Have you ever wanted …
*** EDIT *** As of now, the below code no longer works. However, thanks to a few comments from …