
Azure Static Web Apps and the Trailing Slash
I recently published a blog post on setting up Twitter Cards in Hugo and shared it on Twitter …
Last week I was in Prague for Microsoft Ignite The Tour and I had the pleasure of working with an engineer who wanted to setup an Application Gateway on an existing AKS cluster, ideally using Terraform. This blog post will be a multipart series with the first post, this one, focusing on the simplest way to get started: Azure CLI.
For those who are new to networking and Kubernetes, Application Gateway is a layer 7 load balancer that works with HTTP, HTTPS, HTTP/2, and Web Socket. To put it even more succintly, Application Gateway provides an application delivery controller (ADC) as a service and thus, the service is highly available, scalable and fully managed by Azure. More about App Gateway can be found on Microsoft Docs here and here. It also might be helpful to note the application gateway limits, which can be found here. I have blogged previously on using an Ngnix proxy within your cluster, but Application Gateway technically lives both inside and outside AKS.
Let me explain: when you use App Gateway, you have a few resources that live inside your Azure Resource group:
These resources then communicate, using the managed identity, with a pod running inside your K8s cluster; this pod is installed using this Helm Chart.
Another key difference between an Ngnix proxy and App Gateway is Ngnix provides better URL rewriting and redirecting features than Application gateway and tends to be significantly less expensive.
When adding app gateway to an existing cluster, there are a few things you need to know.
First, app gateway requires its own subnet, which you can create within your existing K8s vnet.
Second you will need the following resources for your new app gateway to work (some of which we just mentioned):
To run the commands listed in this blog post, which will create the resources just mentioned, I always recommend pre-configuring our default environment variables we will need. Here’s an example of mine:
resourceGroup=jdk8s
k8sVnet=jdk8sVnet
appgwName=jdk8sappgw
appgwPublicIpName=appgwjdIP
resourceGroup is the resource group where your existing AKS cluster lives (not the one with the MC_ prefix), and all the resources related to your app gateway will also reside.
k8sVnet is the name of your existing Kubernetes virtual network (vnet) where your new application gateway dedicated subnet will live.
appgwName is the name of your new application gateway.
appgwPublicIpName is the name for the public IP resource we will use with the newly created app gateway.
Diving right in, to create a new dedicated subnet, run the following command:
az network vnet subnet create \
  --name appgwsubnet \
  --resource-group $resourceGroup \
  --vnet-name $k8sVnet  \
  --address-prefix 10.242.0.0/16
You can choose your own address prefix, the one I use is just inline with other subnets I have setup for my cluster (10.240.x.x, 10.241.x.x, etc.).
Once we have a subnet, which is named appgwsubnet (very creative, I know), we are ready to create a public IP address. To do so, run the following commands:
az network public-ip create \
  --resource-group $resourceGroup \
  --name $appgwPublicIpName \
  --allocation-method Static \
  --sku Standard
Note: Be sure to update your DNS with your new IP address. Example: I use Azure DNS for az.jessicadeen.com. I created a new wildcard record for *.ap so anything I later point to *.ap.az.jessicadeen.com will use my app gateway. You can learn more about how I handled wildcard routing in this previous blog post.
This command will create our public IP address with a name appgwjdIP. Unless you really want a public IP with a name that has my initials, you will want to change this.
Great, we have a subnet and a public IP address for our app gateway. To create an application gateway resource, run:
az network application-gateway create \
  --name $appgwName \
  --location eastus \
  --resource-group $resourceGroup \
  --vnet-name $k8sVnet \
  --subnet appgwsubnet \
  --capacity 2 \
  --sku WAF_v2 \
  --http-settings-cookie-based-affinity Disabled \
  --frontend-port 80 \
  --http-settings-port 80 \
  --http-settings-protocol Http \
  --public-ip-address $appgwPublicIpName
This will create an application gateway resource with the WAF_v2 SKU. You can learn more about the possible SKU options here. As you may be able to tell from our command, we linked this gateway to the previously created subnet and public IP resources.
Now, if you plan to use the same WAF_v2 SKU, you will want to enable firewall mode detection. You can do so using the following command:
az network application-gateway waf-config set \
    -g $resourceGroup \
    --gateway-name $appgwName \
    --enabled true \
    --firewall-mode Detection \
    --rule-set-version 3.0
Note: If you use a different SKU, you do not have to run this command. I also have not tested these steps with any SKU other than the one specified.
Great! We now have our gateway created and we are ready to create our HTTP and HTTPS probes. Probes help ensure healthy HTTP responses from our applications. You can learn more about Application Gateway Health Monitoring here. To create our probes, we will need to run the same command twice; once to create our HTTP probe and a second time for our HTTPS probe.
# Create http probe
az network application-gateway probe create \
    -g $resourceGroup \
    --gateway-name $appgwName \
    -n defaultprobe-Http \
    --protocol http \
    --host 127.0.0.1 \
    --timeout 30 \
    --path /

# Create https probe
az network application-gateway probe create \
    -g $resourceGroup \
    --gateway-name $appgwName \
    -n defaultprobe-Https \
    --protocol https \
    --host 127.0.0.1 \
    --timeout 30 \
    --path /
After running the above commands, you will now have two newly created HTTP probes. You can verify this by checking the App Gateway resource in the portal and selecting Health Probes on the left hand side, if you would like a visual confirmation. Here’s an example:

The final configuration step we need to do for our app gateway is link our newly created HTTP probe to our backend HTTP settings within our gateway. To create this link, just run the following command:
# Link http probe to application gateway
az network application-gateway http-settings update \
    -g $resourceGroup \
    --gateway-name $appgwName \
    -n appGatewayBackendHttpSettings \
    --probe defaultprobe-Http
Splendid. We now have our gateway configured. We are ready to move on to our managed idenity since we will need this for our AAD pod identity, which our appgateway pod will use.
First, if you have RBAC enabled on your Kubernetes cluster, run the following command to install the necessary CRDs for AzureIdentity, AzureAssignedIdentity, and AzureIdentityBinding:
kubectl create -f https://raw.githubusercontent.com/Azure/aad-pod-identity/master/deploy/infra/deployment-rbac.yaml
Note: Be sure to run the above command against the Kubernetes cluster in question. I speak from experience (LOL) since I have several clusters available from my terminal.
To create a managed identity, run the following command:
az identity create \
    -g $resourceGroup \
    -n aadappGW
Now, we need to capture a few important data points from our identity in variables we can reuse. Run the following command to capture our clientId, our appgwId and our appgwrgId:
# capture clientId in variable
clientId=$(az identity show \
    -g $resourceGroup \
    -n aadappGW \
    --query 'clientId' \
    -o tsv)

# Capture app gateway ID in variable
appgwId=$(az network application-gateway list --resource-group $resourceGroup --query '[].id' -o tsv)

# capture appgw resource group id in variable
appgwrgId=$(az group show -g $resourceGroup --query 'id' -o tsv)
Perfect. Now we need to grant some permissions to our app gateway using this newly created managed identity.
First, we will give contributor access to our gateway itself:
# Give identity Contributor access to your Application Gateway
az role assignment create \
    --role Contributor \
    --assignee $clientId \
    --scope $appgwId
Second, we will give reader access to our gateway’s resource group:
# Give identity Reader access to the Application Gateway resource group
az role assignment create \
    --role Reader \
    --assignee $clientId \
    --scope $appgwrgId
Excellente! The final configuration piece is actually deploying our app gateway ingress inside our Kubernetes cluster. To start, we will need some environment variables again. Run the following commands to capture the data we need:
applicationGatewayName=$(az network application-gateway list --resource-group $resourceGroup --query '[].name' -o tsv)
subscriptionId=$(az account show --query 'id' -o tsv)
identityClientId=$(az identity show -g $resourceGroup -n aadappGW --query 'clientId' -o tsv)
identityResourceId=$(az identity show -g $resourceGroup -n aadappGW --query 'id' -o tsv)
As you may be able to tell, we are grabbing our applicationGatewayName, Azure subscriptionId, Managed Identity clientId, and our Managed Identity resourceId.
Once we have those, I like to do a simple checks and balances by echoing the commands back:
echo $applicationGatewayName
echo $subscriptionId
echo $identityClientId
echo $identityResourceId
Assuming those values come back with data, we can now download helm-config.yaml file we will use to install our app gateway ingress helm chart. I prefer to use wget to download the yaml since it’s a one-liner:
wget https://raw.githubusercontent.com/Azure/application-gateway-kubernetes-ingress/master/docs/examples/sample-helm-config.yaml -O helm-config.yaml
Note: The above command will simply save the helm-config.yaml in your current working directory.
The yaml downloaded is just a template; we need to fill it with actual information. To do so, we will use sed to replace the <> values in the yaml with our newly captured variables:
# use said to replace <> field values with captured data
sed -i "" "s|<subscriptionId>|${subscriptionId}|g" helm-config.yaml
sed -i "" "s|<resourceGroupName>|${resourceGroup}|g" helm-config.yaml
sed -i "" "s|<applicationGatewayName>|${applicationGatewayName}|g" helm-config.yaml
sed -i "" "s|<identityResourceId>|${identityResourceId}|g" helm-config.yaml
sed -i "" "s|<identityClientId>|${identityClientId}|g" helm-config.yaml
Note: Optional tip - manually open helm-config.yaml in your editor of choice and edit line 47 if using an RBAC enabled cluster (set to ’true’).
Note for multi-namespace support: You’ll notice lines 20-28 of your helm-config.yaml are commented out - this was previously enabled if you wanted appgateway to only watch one namespace or any declared namespace. Simply leave this commented out for multi namespace support.
I also recommend opening your helm-config.yaml to confirm the values truly populated as expected.
Now let’s start playing with helm. The following steps assume the use of Helm3 and, thus, no Tiller. If you are still using Helm2, you will want to make sure you have Helm configured with the necessary service accounts and rolebindings for Tiller.
Let’s add our application-gatewaay-kubernetes-ingress chart repo and then run a repo update:
# add app gateway ingress helm chart repo and update repo
helm repo add application-gateway-kubernetes-ingress https://appgwingress.blob.core.windows.net/ingress-azure-helm-package/
helm repo update
Now let’s install our ingress!
# install appgw ingress using helm chart and helm-config.yaml
helm upgrade --install appgw-ingress-azure -f helm-config.yaml application-gateway-kubernetes-ingress/ingress-azure
Note: Remember, Helm3 does not auto generate names for you anymore, you have to explicitly provide a name or use the --generate-name flag. The above command will name your Helm release appgw-ingress-azure, but you can change according to your preference.
I like to verify everything looks good so once you install the chart, you can run the usual kubectl get pods to see if your appgw-ingress pod is running:
appgw-ingress-azure-5f57885dc4-zhn5j 1/1 Running 0 6m
Assuming it is, let’s test our new gateway!
One of my go to ways to test out ingress is to simply deploy a Jenkins release using the stable/jenkins helm chart and this sample values file - be sure to change line 43 with the hostname of your choice. You could also use wget to download it just as we did with helm-config.yaml:
wget https://gist.githubusercontent.com/jldeen/9d0ffc54c757ef92e1bcb9ff3479c749/raw/c27aaf1c64f434e4bbe6ad7809fa93151cab37f1/jenkins-appgw-values.yaml -O jenkins-values.yaml
I ran the following command against 2 different namespaces and changed the hostname in my values file both times.
# hostname appgateway.ap.az.jessicadeen.com
helm upgrade jenkins --install --namespace default2 -f ./jenkins-values.yaml stable/jenkins

# hostname default.ap.az.jessicadeen.com
helm upgrade jenkins --install --namespace default -f ./jenkins-values.yaml stable/jenkins
Jenkins pods do take about 6 minutes to spin up, but once they do, I was able to navigate to both FQDNs just fine!


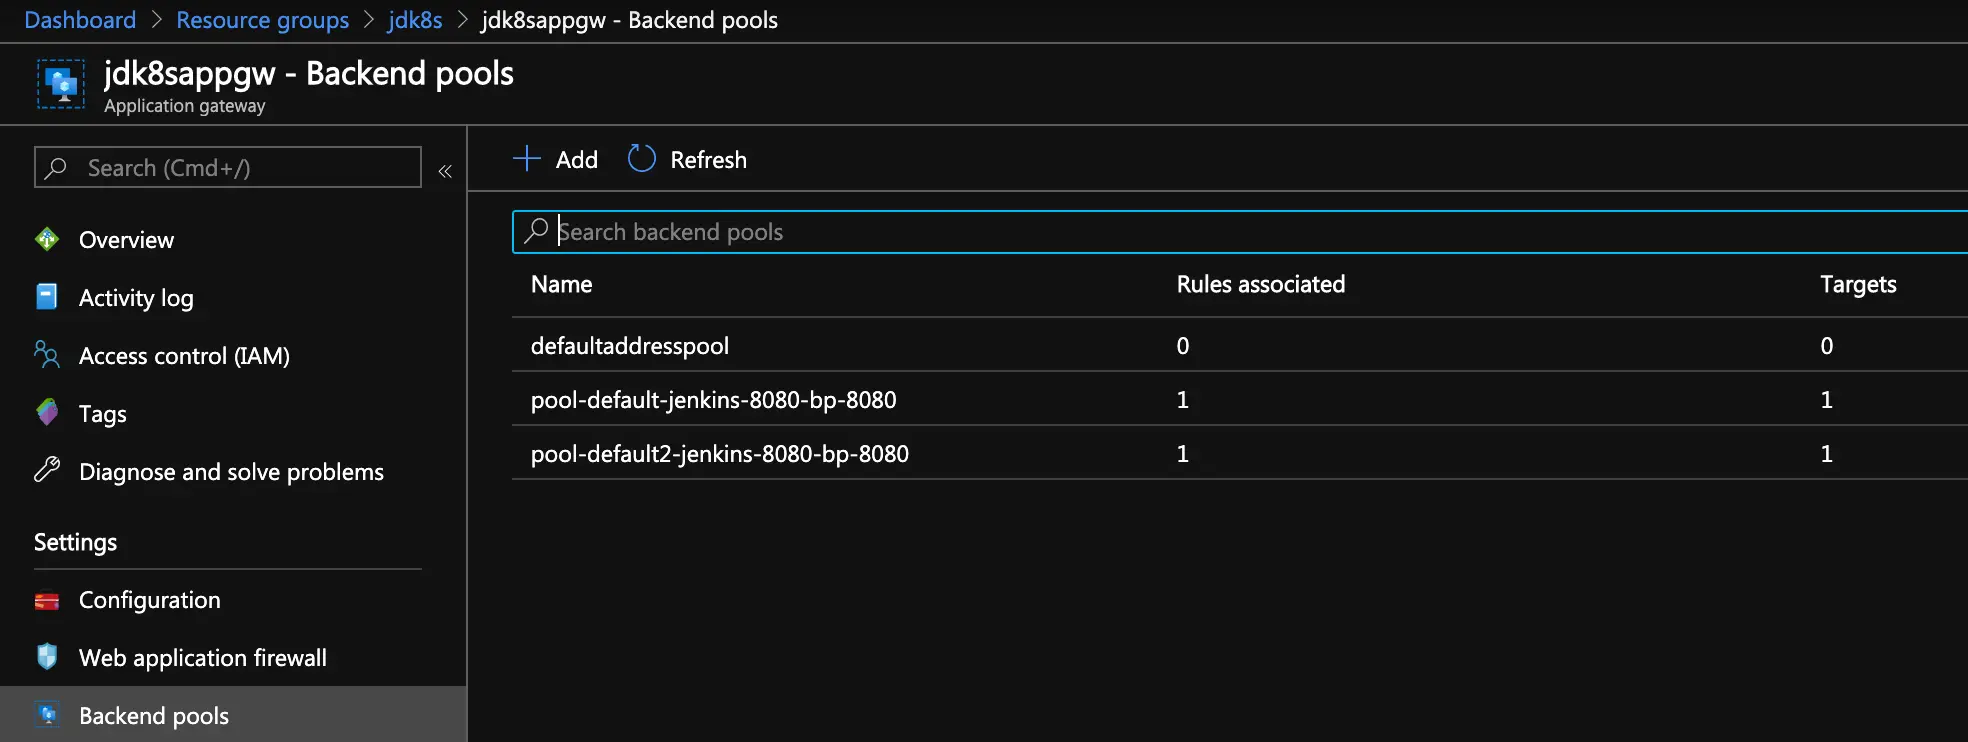
You can also verify the backend routing by drilling down into your app gateway resource within the Azure Portal and selecting “Backend pools” on the left hand side. Here’s an example of mine:

Finally, if you prefer to use your own shell script to create all of the resources and configuration settings outlined in this post, I have a sample script I wrote available below.
Note: You will still need to manually edit line 47 of your helm-config.yaml if using an RBAC-enabled cluster. You will also need to edit the Jenkins Values file, if used, with the desired hostnames.
I recently published a blog post on setting up Twitter Cards in Hugo and shared it on Twitter …

All code featured in this blog post can be found here on GitHub. Problem Have you ever wanted …

We’ve all been there. You do everything correct - you set your container to run as non …