
%20Information%22%2C%22color%22%3A%22%2336a64f%22%2C%22pretext%22%3A%22JFrog%20XRay%20Scan%20for%20%24(Build.BuildID)%20Information%22%2C%22author_link%22%3A%22http%3A%2F%2Fflickr.com%2Fbobby%2F%22%2C%22title%22%3A%22JFrog%20XRay%20Scan%20Report%22%2C%22title_link%22%3A%22%27%24JF_BUILD%27%22%2C%22text%22%3A%22Build%20Artificats%20for%20%24(Build.BuildId)%22%2C%22fields%22%3A%5B%7B%22title%22%3A%22Requested%20for%22%2C%22value%22%3A%22Jessica%20Deen%22%2C%22short%22%3Afalse%7D%5D%2C%22footer%22%3A%22JFrog%20XRay%20Notifications%22%2C%22footer_icon%22%3A%22https%3A%2F%2Fwww.clipartmax.com%2Fpng%2Fmiddle%2F69-698347_jfrog-artifactory-logo.webp%22%7D%5D%7D)
Things to consider when running visual tests in CI/CD pipelines: Azure Devops & GitHub Actions (Part 2)
If you haven’t yet read the first post in this series, I recommend checking it out now. …
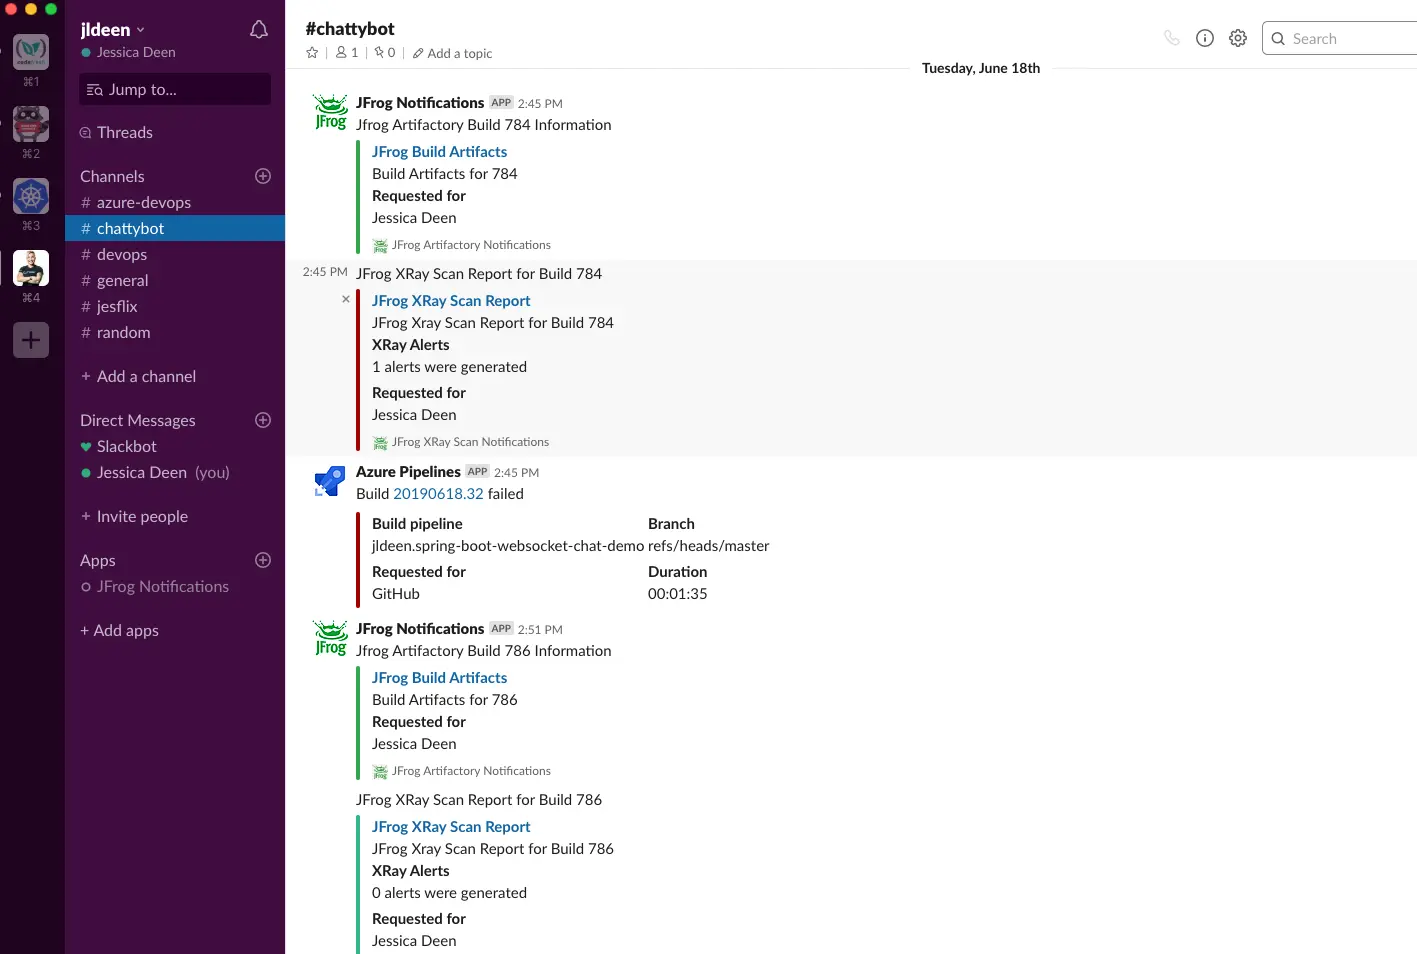
I recently spoke at JFrog’s swampUP conference and in my session I showcased how you can use Azure Pipelines with whatever tools you already use; you can either use a pre-made task, you can write your own in TypeScript, or you can just use command line like I did. I want to recap (and walk through) one specific aspect of my demo: how I made custom Slack Notifications for JFrog Artifactory and XRay and then used Azure Pipelines to trigger the notifications.
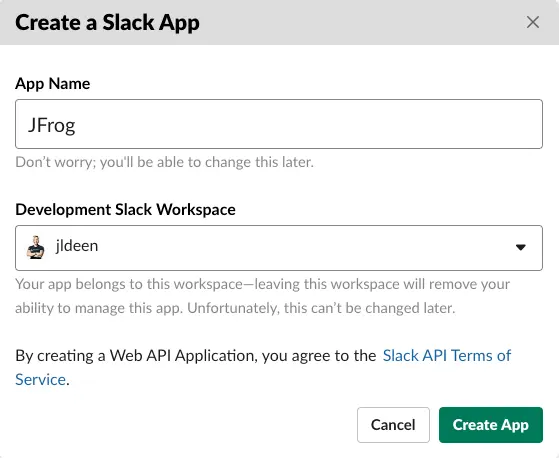
First we will start with Slack itself. From your web browser, login to your Slack account or click this link and sign in.
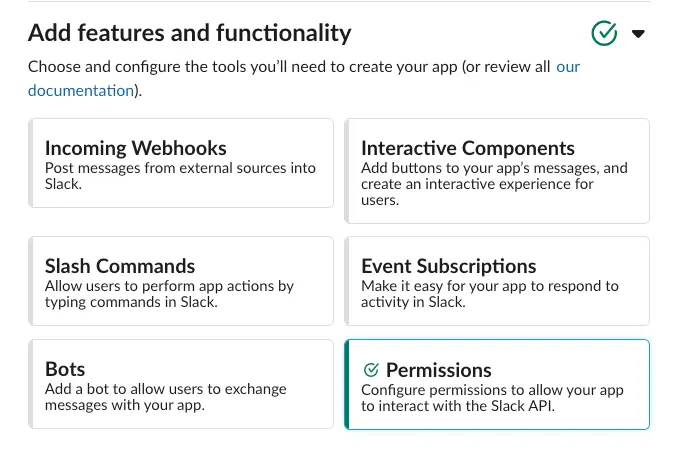
Under Add features and functionality select Permissions
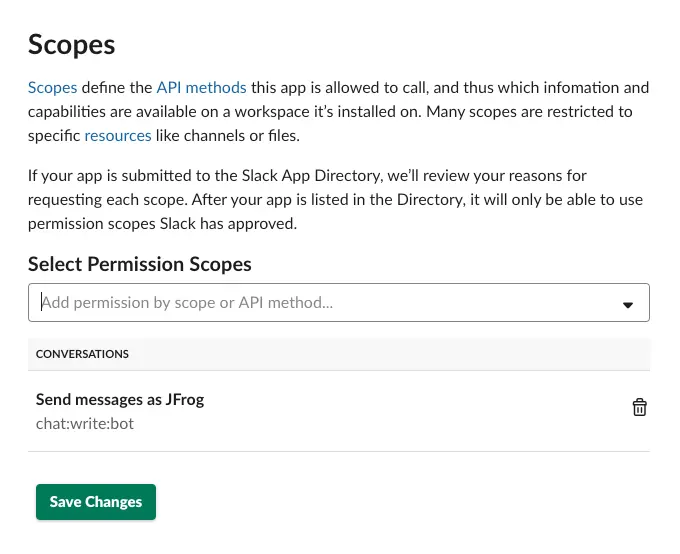
(chat:write:bot)Under Scopes Add the chat:write:bot permission to your app
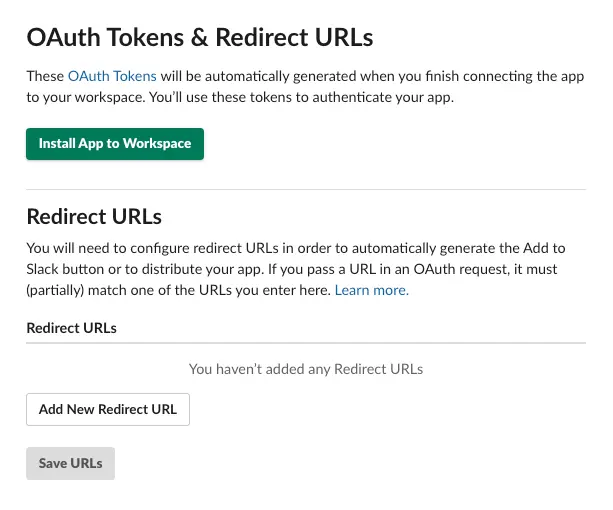
Under OAuth Tokens & Redirect URLs click Install App to Workspace
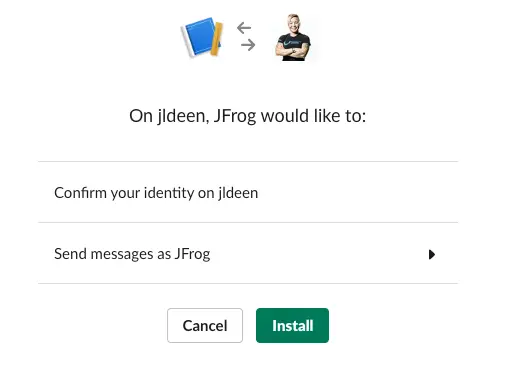
And follow it up with an additional confirmation to Install. Note: Ensure your app can send messages as the app-name
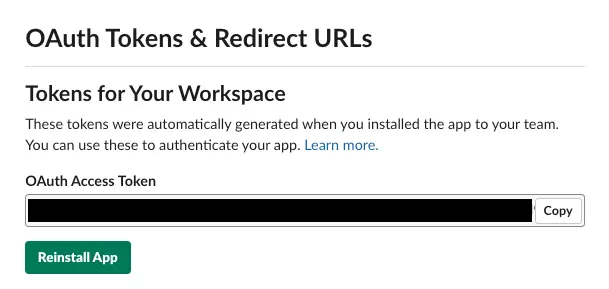
Again under OAuth Tokens & Redirect URLs copy your OAuth token to your clipboard. Keep this in a safe place, do not share it.
You can use curl or Postman to send a POST request to the Slack API, which will then post a message of your choosing (and defining) to a Slack channel of your choosing.
curl -X POST \
  https://slack.com/api/chat.postMessage \
    -H 'Authorization: Bearer token-goes-here' \
    -H 'Connection: keep-alive' \
    -H 'Content-Type: application/json; charset=utf-8' \
    -d '{"channel": "chattybot", "text": "You better post this to channel"}'
Note the -d for HTTP POST data section. You need to structure your data in JSON with the channel and text fields. You can change the text to a more helpful notification, if you wish. An example is below.
{"channel": "$(slackChannel)", "text": "Your JFrog Build $(Build.BuildId) artifacts are viewable here: '$JF_BUILD'"}
However, if you want to structure your data in a more visually appealing and valuable way, I recommend using the attachment feature in Slack’s API. Slack has really fantastic docs and I found Formatting Messages and Attaching content and links to messages super helpful. It even has a Try It button where you can test out how the attachment style message would look.
Below is an example of just the attachment with formatting for a JFrog Xray notification:
{"attachments":
    [
        {
            "fallback": "JFrog XRay Scan for $(Build.BuildID) Information",
            "color": "#36a64f",
            "pretext": "JFrog XRay Scan for $(Build.BuildID) Information",
            "author_link": "http://flickr.com/bobby/",
            "title": "JFrog XRay Scan Report",
            "title_link": "'$JF_BUILD'",
            "text": "Build Artificats for $(Build.BuildId)",
            "fields": [
                {
                    "title": "Requested for",
                    "value": "Jessica Deen",
                    "short": false
                }
            ],
            "footer": "JFrog XRay Notifications",
            "footer_icon": "https://www.clipartmax.com/png/middle/69-698347_jfrog-artifactory-logo.webp"
        }
    ]
}
In fact, Slack’s docs are so good, I can even link directly to the Message Builder I used to compile the above JSON example.
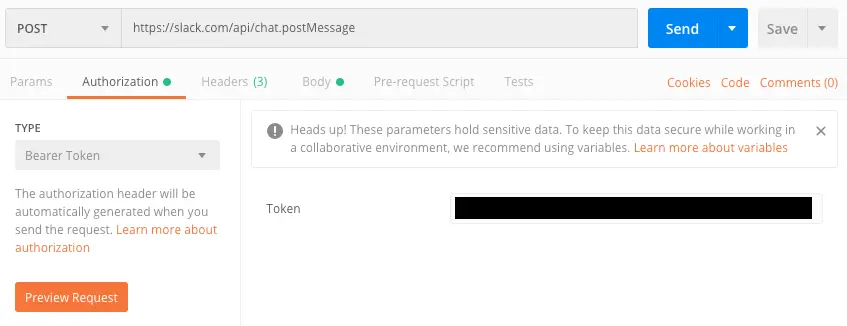
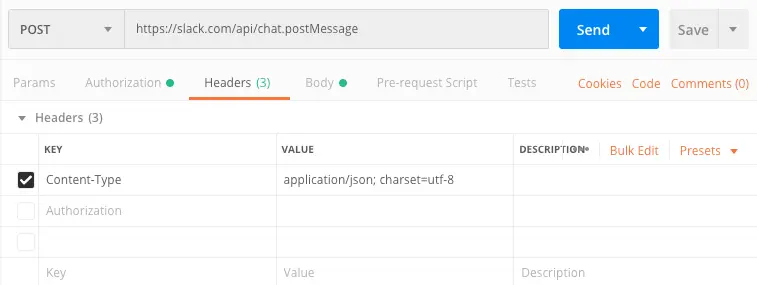
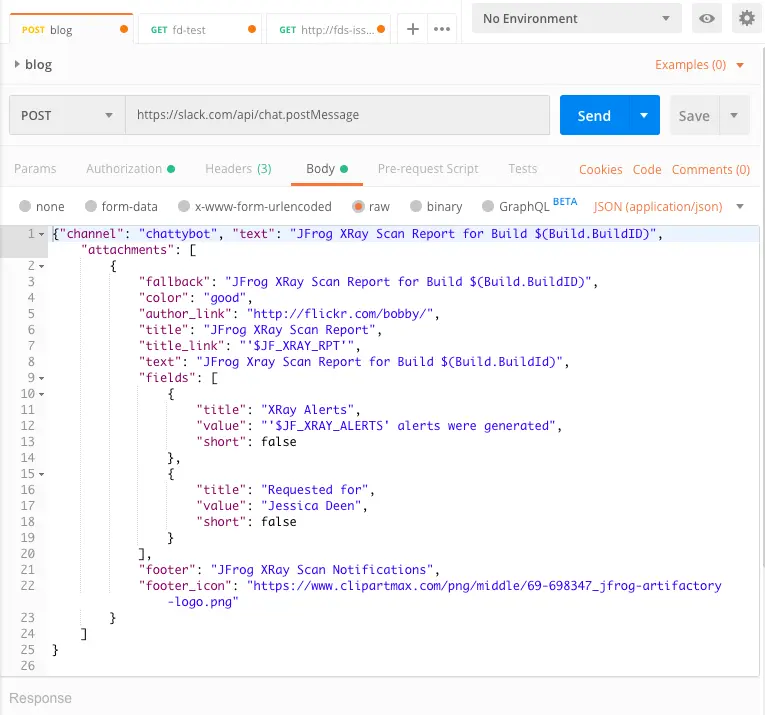
Curl works perfectly fine, and we will use it later in our Azure Pipelines. Slack’s Message Builder also works extremely well to visualize the look and feel of our message. However, to more succintly test all the pieces together, I used Postman. Launch Postman, create a new Request, choose POST, and then use the following settings:
  {"channel": "$(slackChannel)", "text": "Jfrog Artifactory Build $(Build.BuildId) Information", "attachments": [
          {
              "fallback": "JFrog Artifactory Build $(Build.BuildID) Information",
              "color": "#36a64f",
              "author_link": "'$JF_BUILD'",
              "title": "JFrog Build Artifacts",
              "title_link": "'$JF_BUILD'",
              "text": "Build Artifacts for $(Build.BuildId)",
              "fields": [
                  {
                      "title": "Requested for",
                      "value": "$(user)",
                      "short": false
                  }
              ],
              "footer": "JFrog Artifactory Notifications",
              "footer_icon": "https://www.clipartmax.com/png/middle/69-698347_jfrog-artifactory-logo.webp"
          }
      ]
  }
  {"channel": "$(slackChannel)", "text": "JFrog XRay Scan Report for Build $(Build.BuildID)", "attachments": [
          {
              "fallback": "JFrog XRay Scan Report for Build $(Build.BuildID)",
              "color": "'$slackStyle'",
              "author_link": "'$JF_XRAY_RPT'",
              "title": "JFrog XRay Scan Report",
              "title_link": "'$JF_XRAY_RPT'",
              "text": "JFrog Xray Scan Report for Build $(Build.BuildId)",
              "fields": [
                  {
                      "title": "XRay Alerts",
                      "value": "'$JF_XRAY_ALERTS' alerts were generated",
                      "short": false
                  },
                  {
                      "title": "Requested for",
                      "value": "$(user)",
                      "short": false
                  }
              ],
              "footer": "JFrog XRay Scan Notifications",
              "footer_icon": "https://www.clipartmax.com/png/middle/69-698347_jfrog-artifactory-logo.webp"
          }
      ]
  }
You may notice the above examples include undefined variables that simply show up as hardcoded text in the Postman/Curl HTTP POST examples. The reason for this is I actually opted to define them in a simple bash script task within my pipeline; in fact, I use six bash tasks throughout the pipeline.
The first thing I did was install the JFrog CLI on my build server.
#Login to Docker with jfrog artifactory creds
echo $(ART_PASS) | docker login $(artDocker_URL) -u $(ART_USER) --password-stdin && echo "jfrog docker login successful"

# Get Jfrog CLI
if [ -e jfrog ]; then
    echo "Jfrog binary already exists. Logging into Artifactory now.."
else
    echo "Jfrog binary does not exist. Downloading now...."
    wget https:// dl.bintray.com/jfrog/jfrog-cli-go/1.24.2/jfrog-cli-linux-amd64/jfrog
    chmod +x jfrog
fi

# Configure Jfrog CLI
./jfrog rt config $(server-id) --url=$(ART_URL) --user=$(ART_USER) --password=$(ART_PASS)
I used the JFrog CLI for my maven build task, Docker and Helm for my container images and Helm charts tasks, and then I exported the necessary data from those tasks with the jfrog rt build-publish and jfrog rt build-scan commands.
# -- build publish
./jfrog rt build-publish --build-url="https://dev.azure.com/$(System.CollectionId)/$(System.TeamProject)/_build/$(Build.BuildId)" --env-exclude="*key*;*pass*;" $(System.TeamProject) $(Build.BuildId) |& tee publish.txt
# --- Xray Scan
./jfrog rt build-scan --server-id=$(server-id) $(System.TeamProject) $(Build.BuildId) | tee results.json
This allowed me to then aggregate the necessary data, such as links and fauilure information, and then massage it into the message builder structure we used earlier in testing using simple (and previously undefined) variables.
Finally, I created 2 slack triggers in bash using the message format we tested previously with curl and postman, and parsed the exported data into variables.
## Jfrog Build
JF_BUILD=$(sed -n "s/^.*http/http/p" publish.txt)

curl -X POST https://slack.com/api/chat.postMessage -H 'Accept: */*'   -H 'Authorization: Bearer $(slackBotToken)'   -H 'Connection: keep-alive'   -H 'Content-Type: application/json; charset=utf-8'   -H 'accept-encoding: gzip, deflate'   -d '{"channel": "$(slackChannel)", "text": "Jfrog Artifactory Build $(Build.BuildId) Information", "attachments": [
        {
            "fallback": "JFrog Artifactory Build $(Build.BuildID) Information",
            "color": "#36a64f",
            "author_link": "'$JF_BUILD'",
            "title": "JFrog Build Artifacts",
            "title_link": "'$JF_BUILD'",
            "text": "Build Artifacts for $(Build.BuildId)",
            "fields": [
                {
                    "title": "Requested for",
                    "value": "Jessica Deen",
                    "short": false
                }
            ],
            "footer": "JFrog Artifactory Notifications",
            "footer_icon": "https://www.clipartmax.com/png/middle/69-698347_jfrog-artifactory-logo.webp"
        }
    ]
}' && echo "Slack Build Message Posted"
Since XRay and my results.json will tell me the summary of my alerts and I can use that data to fail my pipeline and then leverage that with Slack’s built in style attribute for color and aesthetics.
In fact, as you will see, I just used a simple if/else statement to query the value of that field and set the slackStyle variable to either good(green) or danger(red).
Here’s an example of a failure:

And here’s an example of a successful scan (once I fixed the vulnerabilities detected)
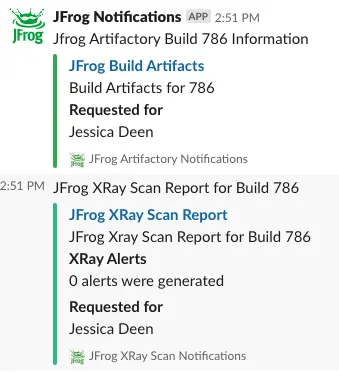
And here’s the code:
## Jfrog Xray Scan
JF_XRAY_ALERTS=$(jq ".summary.total_alerts" results.json)
JF_XRAY_RPT="https://jfrogjd-xray.jfrog.io/web/#/component/details/docker:~2F~2Fjldeen~2Fspring-boot-websocket-chat-demo/$(Build.BuildId)"

if [[ $JF_XRAY_ALERTS -eq 0 ]]; then
    slackStyle=good && echo "No Xray Scan alerts found"
else
    slackStyle=danger && echo "Xray scan alerts found"
fi

curl -X POST https://slack.com/api/chat.postMessage -H 'Accept: */*'   -H 'Authorization: Bearer $(slackBotToken)'   -H 'Connection: keep-alive'   -H 'Content-Type: application/json; charset=utf-8'   -H 'accept-encoding: gzip, deflate'   -d '{"channel": "$(slackChannel)", "text": "JFrog XRay Scan Report for Build $(Build.BuildID)", "attachments": [
        {
            "fallback": "JFrog XRay Scan Report for Build $(Build.BuildID)",
            "color": "'$slackStyle'",
            "author_link": "'$JF_XRAY_RPT'",
            "title": "JFrog XRay Scan Report",
            "title_link": "'$JF_XRAY_RPT'",
            "text": "JFrog Xray Scan Report for Build $(Build.BuildId)",
            "fields": [
                {
                    "title": "XRay Alerts",
                    "value": "'$JF_XRAY_ALERTS' alerts were generated",
                    "short": false
                },
                {
                    "title": "Requested for",
                    "value": "Jessica Deen",
                    "short": false
                }
            ],
            "footer": "JFrog XRay Scan Notifications",
            "footer_icon": "https://www.clipartmax.com/png/middle/69-698347_jfrog-artifactory-logo.webp"
        }
    ]
}' && echo "Slack XRay Message Posted"
Note: Any variable defined in the bash task will just use a simple $ to represent the variable, but any varible defined in Azure Pipelines will use $() to define the variable, as you may have noticed.
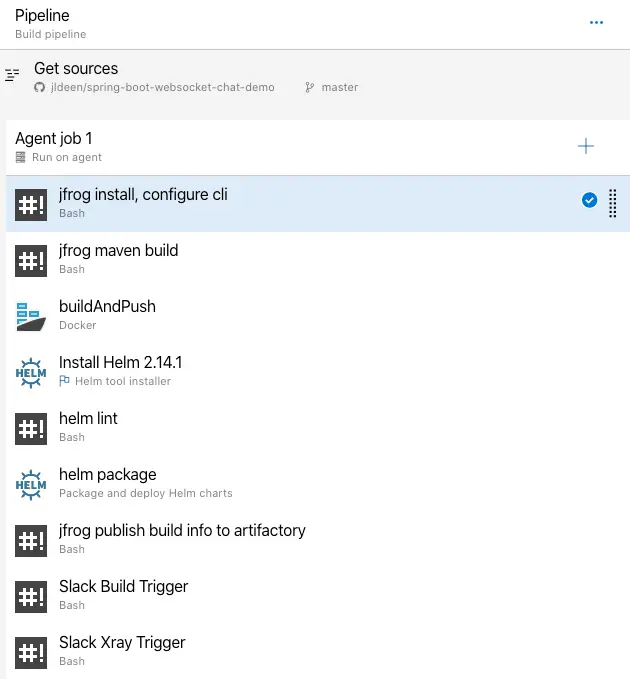
Now that you have defined your tasks, especially if you use the visual CI as I did at the beginning of step 4, you can export those tasks to YAML.
Agent Job 1 or the name of your job. (Step 5.1)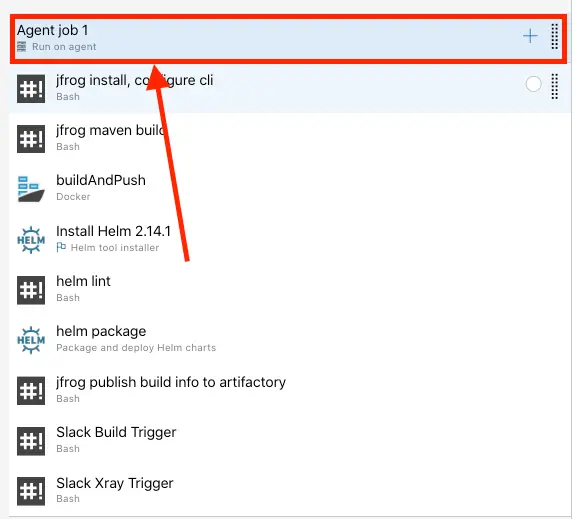
View YAML with the clipboard. (Step 5.2)
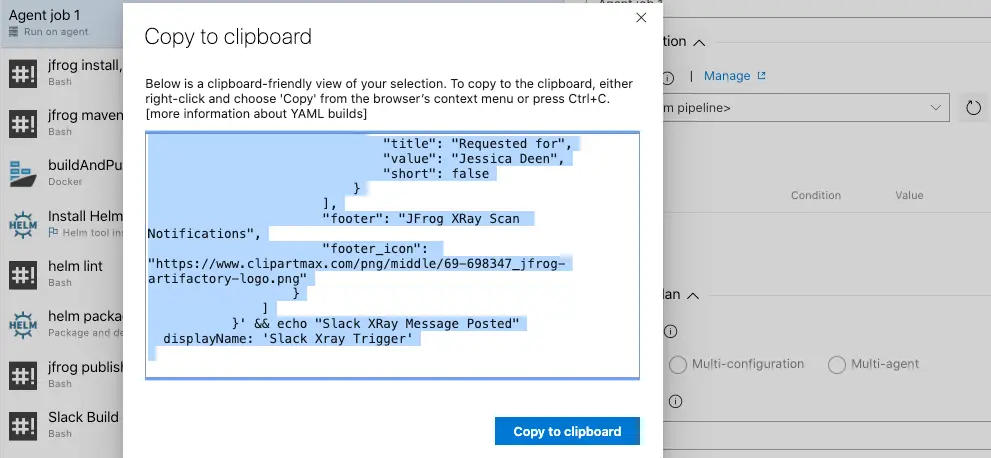
You can then use those steps in a unified YAML pipeline with Azure Pipelines. I have included an example here, complete with a deployment to Azure Kubernetes Service.
The neat thing is since you now “own” your custom notification app, you can reuse parts of the code for whatever tool, product, or use case you have. If you don’t use JFrog, but you use something else and want to parse data, it’s pretty east to structure and tailor the message as you see fit.
In fact, I paired my JFrog Notification “app” and two Slack tasks with the pre-built Azure Pipelines Slack App and had all relative information go into one single Slack channel. In the future, I’d like to further aggregate this data and parse it into a single dashboard within Azure DevOps.
This post will be updated with a link to the session and demo that shows the above live for those of us who are visual learners (I sure am).

If you haven’t yet read the first post in this series, I recommend checking it out now. …

Testing - it’s an important part of a developer’s day-to-day, but it’s also …

What is GitHub Actions? GitHub Actions enables you to “automate, customize, and execute …